When water damage occurs, mold can quickly become a serious issue if not addressed promptly. Understanding the causes and effects of mold is vital in tackling this problem effectively. You’ll need to assess the extent of the damage and identify moisture sources before you begin the mold removal process. This guide outlines ten essential steps that can help you manage mold removal efficiently, ensuring a safer and healthier environment. Let’s explore these steps further.
Key Takeaways
- Immediately assess the extent of water damage and identify moisture sources to prevent mold growth within 24 to 48 hours.
- Wear personal protective equipment (PPE) and ensure proper ventilation while cleaning affected areas to safeguard health.
- Use effective cleaning agents to scrub surfaces thoroughly, focusing on crevices, and rinse with clean water afterward.
- Dry all surfaces completely using fans or dehumidifiers to reduce moisture levels and discourage mold re-growth.
- Regularly monitor humidity levels, aiming for below 60%, and conduct inspections to catch early signs of mold.
Understanding Mold: Causes and Effects
Although it may seem harmless at first, mold can quickly become a serious issue after water damage. Understanding mold growth is essential for maintaining a healthy environment.
Mold thrives in moist conditions, often appearing within 24 to 48 hours after water exposure. In your home, this can lead to structural damage and various health risks. Exposure to mold can trigger allergies, respiratory issues, and even more severe reactions in sensitive individuals.
Knowing the potential dangers helps you take proactive measures to prevent mold proliferation. By promptly addressing water damage and controlling humidity levels, you can greatly reduce the chances of mold growth.
Prioritizing a mold-free living space not only safeguards your health but fosters a sense of belonging in a safe, clean home.
Assess the Extent of Water Damage
When you face water damage, it’s crucial to evaluate the extent of the damage immediately to prevent mold growth and structural issues.
Start your water damage evaluation by inspecting all affected areas, including walls, floors, and ceilings. Look for signs of moisture, such as discoloration or warping.
Next, perform a damage severity evaluation to determine how deeply the water has penetrated materials. This step will help you prioritize which areas need immediate attention and which can wait.
Use moisture meters if available to get accurate readings. Document your findings with photos and notes for reference.
Identify and Eliminate the Source of Moisture
To effectively combat mold growth, you need to identify and eliminate the source of moisture.
Start by inspecting the areas affected by water damage for any leaks or dampness.
Promptly repairing these leaks and improving your ventilation systems will create a drier environment that discourages mold proliferation.
Inspect Water Damage Areas
As you begin addressing water damage, inspecting the affected areas is essential for identifying and eliminating the source of moisture.
Start with a thorough mold inspection, as mold can proliferate quickly in damp conditions. Look for visible signs of mold growth, discoloration, or musty odors.
Conduct a moisture assessment by using a moisture meter to measure levels in walls, floors, and ceilings. Pay special attention to hidden areas like behind appliances and under carpets.
Document your findings, as this information will help you make informed decisions on necessary repairs and remediation strategies.
Repair Leaks Promptly
While addressing water damage, promptly repairing leaks is essential for eliminating the source of moisture that fosters mold growth.
Effective leak detection is your first step. Regularly inspect plumbing, roofs, and basements to catch leaks early. Once identified, employ suitable repair techniques, such as sealing joints or replacing damaged pipes, to prevent further issues.
Ignoring even small leaks can lead to significant water accumulation, creating an ideal environment for mold. Make it a priority to address any signs of moisture immediately; the longer you wait, the more challenging the situation becomes.
Improve Ventilation Systems
Improving ventilation systems is essential for identifying and eliminating the source of moisture that can lead to mold growth.
You need to focus on ventilation improvements that enhance air circulation throughout your space. Start by evaluating your current system; verify that exhaust fans in bathrooms and kitchens are functional and vented outside. Open windows when possible to encourage fresh air flow, and consider installing additional vents or fans in areas prone to moisture buildup, like basements and attics.
Also, regularly clean filters and ducts to maintain peak performance. By effectively managing air circulation, you reduce humidity levels, making your environment less favorable for mold.
Taking these steps helps create a healthier space, fostering a sense of community and belonging among those who inhabit it.
Ensure Safety Before You Start
How can you guarantee your safety before tackling mold removal after water damage? First, gather the necessary personal protective equipment (PPE) to safeguard yourself. This includes gloves, goggles, and a respirator to guard against harmful spores.
It’s essential to wear durable clothing that you can dispose of after the cleanup, preventing further contamination.
Next, make sure your workspace is well-ventilated. Open windows and use fans to circulate air, minimizing inhalation risks.
Always assess the area for potential hazards, such as electrical issues or structural instability, before starting the removal process.
Remove Affected Materials and Contents
Once you’ve guaranteed safety, it’s vital to identify all materials and items affected by water damage.
Safely dispose of any contaminated contents to prevent mold growth, and make certain to document everything for insurance purposes.
This systematic approach not only aids in thorough mold removal but also streamlines the recovery process.
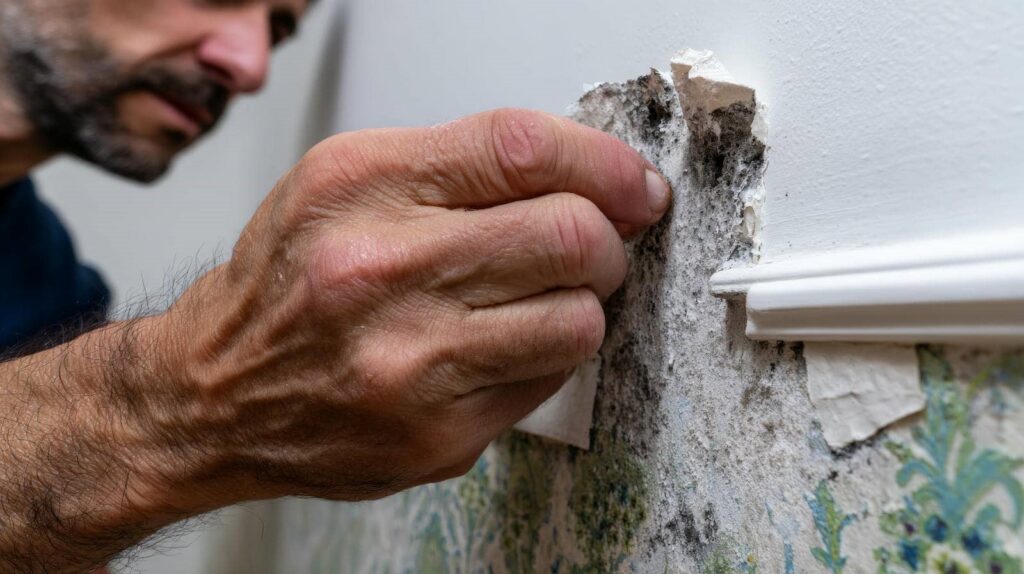
Identify Affected Materials
To effectively tackle mold removal after water damage, you need to accurately identify the materials affected by moisture.
Start by inspecting your home for various mold types, which can thrive on different surfaces like wood, drywall, and carpet. Look for discoloration, warping, or a musty odor, as these are indicators of mold growth.
Once you’ve pinpointed the affected surfaces, assess their condition—some may be salvageable, while others might need complete removal.
Remember, porous materials are more susceptible to mold penetration and often require more drastic measures.
Safely Dispose Items
After identifying the affected materials, it’s crucial to safely dispose of items that have been compromised by mold or excessive moisture.
Begin by sorting through your belongings and separating those that can’t be salvaged. Items made of porous material, like carpets and upholstered furniture, often require proper item disposal due to mold infiltration.
Check local regulations, as some items may qualify as hazardous waste. You can typically dispose of these materials at designated facilities or during special collection events.
Seal contaminated items in plastic bags to minimize spore spread, and label them appropriately.
Handling this process carefully guarantees not only your safety but also the well-being of your environment and community.
Document Damaged Contents
Following the safe disposal of compromised items, it’s important to document the damaged contents before removing them from your space.
Start by creating an inventory checklist that details each affected item, including descriptions, quantities, and estimated values. This documentation is essential for your insurance claims, as it provides evidence of the loss.
Take photographs of damaged items from different angles to support your claims further. Make sure you keep records of any receipts or appraisals related to the contents.
By meticulously recording this information, you can streamline the claims process and potentially recover costs for your losses.
How to Clean and Disinfect Surfaces
When dealing with mold after water damage, it’s essential to clean and disinfect surfaces thoroughly to prevent further growth and health risks.
Start by gathering effective cleaning tools such as brushes, sponges, and mop heads. Choose appropriate disinfecting agents, like hydrogen peroxide or commercial mold removers, ensuring they’re safe for the surfaces you’re treating.
Apply the disinfectant generously, allowing it to sit for the recommended time to effectively kill mold spores. Scrub affected areas with your cleaning tools, focusing on crevices where mold can hide.
Rinse surfaces with clean water and dry them thoroughly to discourage future mold growth. By following these steps, you foster a healthier environment for yourself and those around you, reinforcing your commitment to safety and well-being.
Best Practices for Mold Removal
Since mold can pose serious health risks and damage property, adhering to best practices for mold removal is crucial.
Begin by wearing protective gear, including masks and gloves, to safeguard your health. Seal off the affected area to minimize mold spores’ spread, and guarantee proper ventilation to maintain air quality.
Use a HEPA vacuum to remove loose mold particles before scrubbing surfaces with a mold-specific cleaner. After cleaning, discard contaminated materials responsibly.
Implement mold prevention strategies, such as controlling humidity levels and using dehumidifiers in damp areas. Keeping surfaces dry and guaranteeing good air circulation can further safeguard your environment.
Dry the Area Completely
To effectively combat mold growth, you need to dry the area completely after water damage. Start by using drying techniques like fans, dehumidifiers, and air movers to reduce moisture levels swiftly.
Make certain all surfaces, including floors, walls, and furniture, are thoroughly dried, as even small amounts of moisture can encourage mold development. It’s essential to monitor humidity levels in the room; aim for less than 60% for effective moisture control.
Additionally, remove any wet materials, such as carpets or drywall, that can’t be dried quickly. Remember, the faster you respond, the less likely mold will take hold.
Keep an Eye Out for Mold Returning?
Even after taking steps to dry the area completely, vigilance is necessary to guarantee mold doesn’t return.
Implementing a mold monitoring strategy is essential. Start by conducting regular inspections of the affected area, looking for signs of moisture or mold growth.
Check hidden spots, like behind walls or under carpets, where mold can thrive unnoticed. Consider using a moisture meter to detect hidden dampness.
If you spot any early signs of mold, address them immediately to prevent a larger infestation.
Engaging in proactive mold monitoring not only protects your home but also fosters a sense of community responsibility.
By staying diligent, you create a safer, healthier environment for yourself and those around you.
Implement Preventative Measures for the Future
Implementing preventative measures is crucial for safeguarding your home against future mold growth. Start by using mold-resistant materials in areas prone to moisture, such as bathrooms and kitchens. These materials greatly reduce the likelihood of mold taking hold.
Additionally, conduct regular inspections of your home, checking for leaks, condensation, or any signs of water damage. Early detection is key; addressing issues promptly can prevent mold from becoming a larger problem.
Verify proper ventilation in high-humidity areas by using exhaust fans or dehumidifiers, which help maintain ideal moisture levels. By taking these steps, you not only protect your home but also create a safe, healthy environment for yourself and your loved ones.
Don’t wait for mold to return—be proactive!
Frequently Asked Questions
Can I Remove Mold Myself or Should I Hire a Professional?
You can tackle DIY mold removal if the area is small and manageable, but for extensive infestations, professional help is safer. Prioritize your health and home’s integrity when deciding the best approach.
How Long Does It Take for Mold to Grow After Water Damage?
Mold can start to make its presence known within 24 to 48 hours after water damage. To prevent this unwelcome guest, implement effective prevention methods, like controlling humidity and ensuring proper ventilation in your space.
What Are the Health Risks Associated With Mold Exposure?
Mold exposure can lead to various health effects, including respiratory issues, allergic reactions, and skin irritations. You might experience mold symptoms like coughing, sneezing, or fatigue, especially if you’re sensitive or have pre-existing conditions.
Does Insurance Cover Mold Removal After Water Damage?
While insurance policies can often provide assistance, coverage limits may vary greatly. You should review your specific policy details to determine whether mold removal costs are included after water-related incidents. Being informed helps you navigate effectively.
Are There Specific Products Recommended for Mold Removal?
For effective mold removal, you’ll want to use products like hydrogen peroxide or vinegar. These effective cleaning agents target mold spores, ensuring a thorough clean and helping you create a healthier living environment.
Summary
Tackling mold after water damage demands diligence and determination. By decisively addressing the dampness and deploying diligent drying techniques, you can defeat the dreaded danger of mold recurrence. Remember, regular inspections and proactive precautions pave the path to a pristine, protected home. Stay savvy about your surroundings, and prioritize preventative measures to guarantee a safe and healthy living space. With these steps, you’ll successfully safeguard your sanctuary from future mold mischief.